Introduction
Iris is a very useful image processing tool. Here is the link to the Iris official web site, where at the end of the first page you will find many tutorials.
Iris is a free software, developed with the focus of processing astronomical images (astrophotography), which requires to be able to extract even the minimum image detail in the photo while fighting against noise, through techniques as photo stacking and dark frame subtracting. That is why Iris contains some features not available in regular image processing software.
We run Iris using a desktop application shortcut where its Compatibility tab has the setting "Compatibility mode" established with the "Windows 7" option. Also the option "Run this program as administrator" is enabled.
In the "Iris: File > Settings..." window, for the "File type" setting I have the "FIT" option selected.
In the "Camera settings" dialog window (click the corresponding button in the tool-bar), for the setting "Digital camera: Model" I have selected "NIKON (D2H/D90)", which works correctly with my Nikon D7000 photos. Also for the "RAW Interpolation method" setting I have selected the "Linear" option.
With Iris you can even write scripts to run the program commands and simplify repetitive tasks. Here you have a link to the Iris Command List that can be used in those scripts. Unfortunately for Linux and Mac users, this is a Windows only application.
The Tool-Bar
The image below shows the Iris toolbar. There you have the buttons to zoom-in, zoom-out and to zoom at pixel level scale (1:1).
The Command Window
Iris has a lot of functionality exposed as menu options, but there is even more functionality available through the use of commands. To open the command window, click on the command window in the tool-bar and a window titled "Command" will popup. In this window, the symbol ">" is used as a prompt. The Iris commands are case-insensitive: you can use uppercase or lowercase letters at your will. To indicate -for example- the use of the command load green followed by the command stat we will show:
>load green
>stat
With the cursor at the end of each command line, pressing the Enter key will trigger the command in that line. In the example above —it must be obvious— you have to trigger each command in the given sequence. When you need to specify parameters after a command, it is not required to separate them with commas, you must leave them separated by one or more blank spaces.
Pixel Coordinates
The position of the image pixels is given with (x, y) coordinates, where x is measured in the horizontal dimension and y in the vertical one. The coordinate system origin is (1,1) at the bottom left corner. However, in ImageJ the image origin is (0,0) at the top left corner. For this reason, to convert pixel coordinates between Iris and ImageJ, supposing the picture has W x H pixels (horizontal by vertical dimensions) you should use:
ImageJ.y + Iris.y = H
Iris.x = ImageJ.x + 1
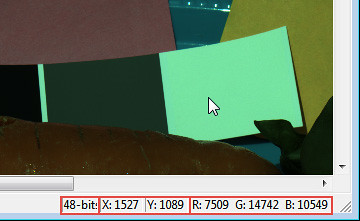
In Iris you can see the cursor coordinates and the pixel color values under the mouse cursor in the status bar, as shown in the following image.

In the Iris status bar you will find: 1) the image format, 2) the pixel coordinates and 3) the pixel color values under the mouse cursor.
The Threshold Control
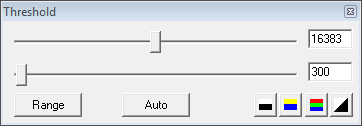
When editing an image in Iris, you will see a floating window titled "Threshold", as shown below. If it is not there, you can make it appear by clicking on the corresponding Iris tool-bar button. This window contains the "Threshold Control". Iris displays the currently open image according to the settings in this control, it helps you to get a better visualization of your image.

In this example, the Threshold control is set with 300 as minimum (black) and 16,383 as maximum (full brightness).
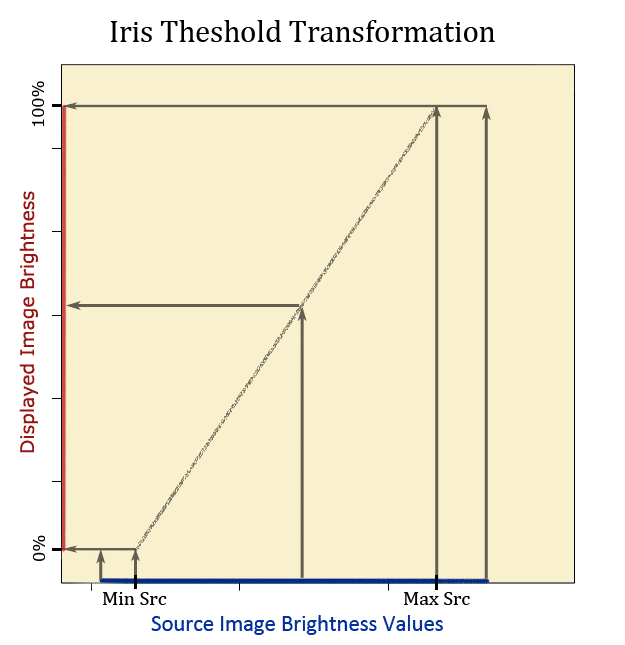
The threshold control has two sliders: the top one is to set the brightness level in your image that must be shown with the maximum display brightness (Max Src), and the bottom one to indicate the brightness in your image that must be shown as black (Min Src). The displayed brightness of your image is transformed in a way that input values below or equal to Min Src are mapped to black (zero) and values equal or above to Max Src are mapped to the maximum possible brightness. The values between the Min Src and Max Src are linearly mapped from the minimum (black) to the maximum brightness output.

This is the effect of the Threshold Control settings. You can play with it for a better examination of your image or you can input the black and the white level on it to have a fair image visualization.
The use of this control does not change the pixel color values in your image, it affects only the way Iris displays the image, you can see that by moving the threshold sliders and watching the pixel color values under the mouse cursor in the status bar: The image brightness changes, but the pixel values remain the same. If you save the image with the ".fit" format —the default file format in our suggested configuration—, for example with the command save <a file name>, the image will be saved regardless the setting in the Threshold control.
When you save the image to the ".jpg" format, the Threshold settings has an impact on the image saved in the file!
Each RGB channel in a ".jpg" image has 8 bits values, so they go through 0 to 255, corresponding to the 0% and the 100% brightness in the Threshold transformation. This way, if you (for example) have a 12-bit image which has 4,096 as "physical" Max Src, and —for any reason— any value below 1,024 must be considered black, setting these values (4096, 1024) in the Threshold control will display a fair representation of your image data. When you save it to the ".jpg" format, the 1,024 to 4,096 pixel color values will be mapped to 0-255.
Saving a Image With the ".tif" format
In the case of ".tif" files, the Iris Threshold control does not affect the resulting image in the file, but there is a consideration of another type that must be taken into account.
The RGB ".tif" files have 16-bit channels and the values there are unsigned, which means they can go from [0 to 65,535]. However, the Iris maximum working range for a channel is 16-bit signed, which means they can hold values from [-32,768 to 32,767]. For this reason, any time you open a ".tif" file in Iris, the 0 to 65,365 channel values in the file are downscaled by a factor of 2 to fit in the Iris working range (65,365/2 = 32,767 in integer division), and these are the values you will see on the screen (in the status bar).
Correspondingly, when you save an image to a ".tif" file format, the image values are escalated (multiplied) by a factor of 2. This reverses the initial downscale and makes transparent to you to open, edit and then save ".tif" files. However, this scheme works under the assumption that your image values are spread between 0 and 32,767. For this reason, if you want a properly saved ".tif" file, you have to escalate the pixel color values in your image in a way that 32,767 corresponds to full brightness.
For example, if we have an image where the minimum and maximum pixel color values (representing the black level and full brightness) are [0 to 16,383], we can properly display the image in Iris using those values in the Threshold control. However, if we want to save that image in a ".tif" file format with the same look as when using the Threshold control as described, we must multiply the image values by a factor of 32,767/16,383 = 2 before saving it.
If after the escalation, you leave the Threshold control as indicated, you will notice it is displayed too bright. To correct this, we have to update the Threshold control with the current brightness range: 0 to Min Src and 32,767 to Max Src.
