EDIT 2015-Mar-11: There is a new version of ImageJ called ImageJ2 and also there is a distribution called Fiji. This plug-in does not work with those versions of ImageJ. They have made some backward incompatible changes in the expected code for a javascript plug-in that causes to colorMatrix to do not work at all.
This colorMatrix plug-in is compatible with the latest version (1.48) of ImageJ1. You should download and use that version if you wan to use colorMatrix.
On the other hand, we have also developed the imgnoiser R Package, which is focused on the image noise analysis, but includes functions allowing the development of a raw file photograph using any color conversion matrix and tonal curve you have. You can read bout the imgnoiser package here; and in particular about the use of your color matrix in the raw development process ("By hand" or DIY) in this article section.
colorMatrix is an ImageJ script (colorMatrix) that helps you to transform an image from one RGB color space to another one. This transformation is made through the use of a color matrix given by you.
This tool has been created for the study and evaluation of such color matrices. This way, you can analyse the results from one color matrix isolated from additional adjustments that are done to the image —officially or "under the hood"— when you use that color matrix inside of a photo or image editing tool.
What it does
The colorMatrix script gets as input three monochromatic images, with the same dimensions, representing the input red, green and blue channels (Rs, Gs, Bs). colorMatrix also gets as input a 3x3 color matrix.
In the following images, the symbols with blue color represent the information you will enter as input in the dialog window the script will show you.

The symbols with blue color represent the information you will enter as input in the dialog window the script will show you.
The first step colorMatrix does is to apply your color matrix to the input channels in order to get the intermediate RGB output channels (Rd, Gd, Bd). The matrix is applied using floating point arithmetic precision (24 bits of precision). This way, intermediate values during the process won't be lost as when using integer arithmetic.
Those intermediate output channels will have further processing before they are merged to build a RGB image, as is depicted with pseudo-code in the following picture. Remember the blue symbols are data you will input in colorMatrix dialog window.

In this pseudo-code, the operations with a channel Cd represents operations on each pixel value in that channel.
After the color matrix transformation, each pixel value in each intermediate channel is checked out to ensure it is in a given range of [Min, Max] ADU values. If it is not, the pixel value is clipped to the minimum or maximum value correspondingly.
Later, a Gamma Correction is applied to each pixel value on each channel. This is an optional step, if the gamma parameter is equal to 1, this step is not executed at all. Notice the gamma value is specified with its reciprocal value. For example, to apply a Gamma Correction of 1/2.2 your input for the gamma value must be 2.2.
The Gamma Correction is applied to the pixel color values in the [0,1] domain. Before the correction, the pixel values are divided by the given Maximum output ADU value. After the Gamma Correction the pixel values are returned to its original domain by multiplying the result by the Maximum output ADU value.
Finally, the intermediate channels are merged to build and show you the resulting RGB image.
Usage
To run colorMatrix select the "colorMatrix" command from the corresponding ImageJ plugins menu option, the one you chose during the script installation. If you installed colorMatrix while ImageJ was open, you must run the command "Help » Refresh Menus" or restart ImageJ.
colorMatrix will show you a dialog window where you can input the required parameters.
Input Color Channels
In this section you must define the monochromatic images that will be used as input RGB channels. They are represented by (Rs, Gs, Bs) in the section "What it does". These images must have the same dimensions in order to have red, green and blue values for each pixel in the resulting image, which —of course— will have those common dimensions .
Before calling colorMatrix, you must have at least two images opened in ImageJ. You will probably want to have three images opened, one for each RGB input channel.
For the each of the Red Channel, Green Channel and Blue Channel parameters you must select one of the opened images.
colorMatrix will try to guess which of the opened images corresponds to each parameter and will show the dialog with those image titles selected as default values. The guessing is made by checking the image titles. If any of them contains the sub-strings "r", "g" or "_b" (for red, green and blue), it will be selected as the default image for the corresponding RGB channel. If there is no matching, colorMatrix will just select the first image in the ImageJ list of opened images. In any case, you can override this default selection and pick up the image you really want to use for each channel.
Output Image Options
Output image file name: Is the title will have the resulting image.
Save output image channels: If this option is selected, each resulting channel will be saved. The "resulting channels" are those referred as (Rd, Gd, Bd) in the section "What it does" in the state they have at the end of the processing.
This is useful because the final RGB composite image in ImageJ is unavoidable an only 8-bit per channel image, and you may have output channels with more precision than that, that you may want to keep.
For example, if you have 14-bit input channels, you will have 14-bit output channels, and you may want the resulting RGB channels at that level of precision, perhaps to further processing those channels in ImageJ or maybe with another tool.
If you don't select this option, colorMatrix will anyway ask you if it is OK for you to close each of the resulting RGB image channels without saving it. This is an ImageJ behavior that can not be overridden.
Gamma: You must enter here the reciprocal of the value that colorMatrix must use in the Gamma Correction of the resulting channels. For example, for a gamma correction of
1/2.4you should enter here2.4.If you don't want Gamma Correction you must enter
1for this parameter, you can not leave a blank here, otherwise you will get an error message. If you set1for this parameter nothing related to Gamma Correction at all will be done to the channels.Minimum output ADU
- Maximum output ADU You must enter here the minimum and maximum acceptable values for each pixel RGB color component value. If the color value is lesser than the given minimum value, it will be set (clipped) to that minimum value. If the color value is greater than the given maximum value, it will be set (clipped) to that maximum value.
The Color Matrix
In this section you must enter the color matrix component values.
- Scales for output Red channel
- Scales for output Green channel
- Scales for output Blue channel Corresponds to the each row of the M matrix shown in the section "What it does".
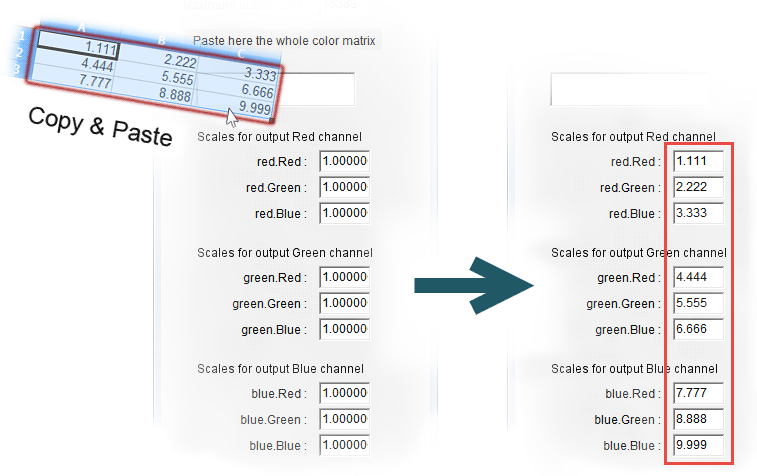
As a helper, there is a multi-line area (under the label "Paste here the whole color matrix"), where you can copy & paste a spreadsheet range of 3 by 3 cells, in which case the range values are moved to the corresponding matrix components.
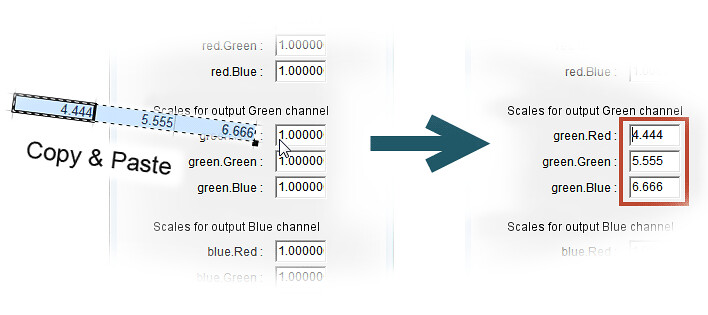
In the same sense, if you paste a spreadsheet horizontal range selection of three cells in the parameter corresponding to beginning of a matrix row (e.g. red.Red, green.Red or blue.Red), each of the three cell values will be assigned to the corresponding row element.
Of course, it is not mandatory to copy and paste the matrix values. You can enter and edit them one by one.
Installation
To install colorMatrix, you just have to download the latest version and drop it in the plugins folder under the ImageJ installation folder. The actual location of that folder in your computer depends on which one you chose during the installation of ImageJ. In the following section we will assume you installed ImageJ in the folder suggested by its installer. If that is not the case use the corresponding folder.
Windows
On Windows OS, the plugin folder path is:
C:\Program Files\ImageJ\plugins
However, to keep a tidy plugin folder structure, we recommend you to create a new folder under the plugin one —for example "RGB Scripts"— and drop there the script. This way, at the end you will the have the script with this full path and file name:
C:\Program Files\ImageJ\plugins\RGB Scripts\colorMatrix.js
Linux
Follow the same steps as described for above for Windows. However, in Linux, the ImageJ plugin folder is in:
/usr/local/ImageJ/plugin
Mac OS X
Follow the same steps as described above for Windows. However, in Mac OS X, the ImageJ plugin folder is somewhere under (sorry, but I don't know exactly the default plugin folder location in Mac OS X):
/Applications/ImageJ/
License
By downloading colorMatrix you agree to the terms of use under Apache 2 License. Please check this LICENSE file for more information.


